
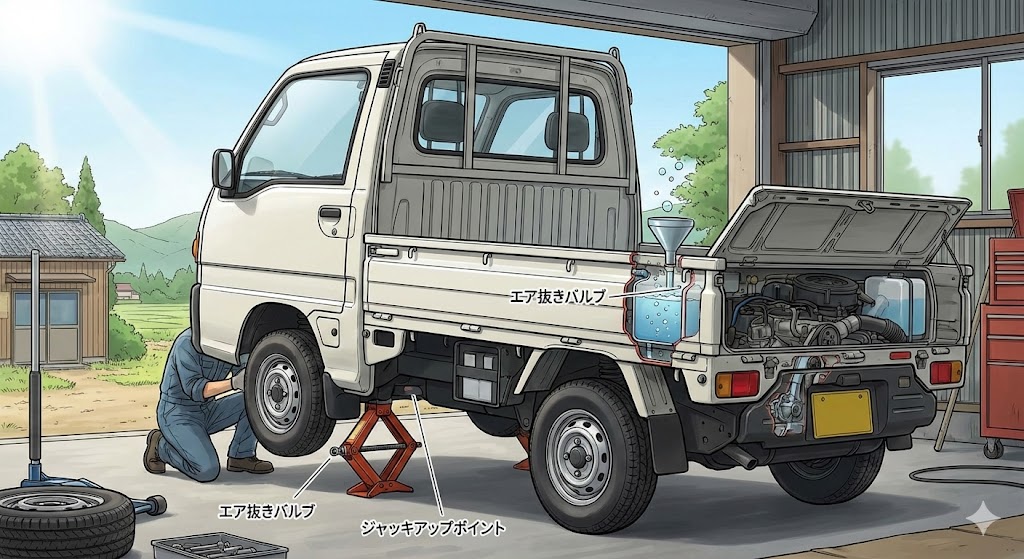
スバル・サンバー(TT/TV/TW/KS/KV系)は、「リアエンジン・フロントラジエーター」という特殊な構造をしています。ラジエーターからエンジンまで、床下を長い冷却配管が通っているため、通常の車と同じやり方では配管内の空気が抜けきらず、オーバーヒートの原因になります。
ここでは、DIYで確実にエアを抜くための「2つの裏技」と、絶対に触ってはいけない「危険なエア抜きポイント」について解説します。
この記事の内容
- 1. 成功の鍵!必須の「裏技」2点セット
- 2. 【図解】エア抜き3箇所の位置と「触ってはいけない場所」
- 3. 実践!ウォーターポンプ交換後のエア抜き手順
1. 成功の鍵!必須の「裏技」2点セット
整備書通りの平地作業ではエアは抜けません。物理的に空気の通り道を作ります。
① 極端な「前上げ」ジャッキアップ
理由:床下の長いパイプを斜めにするため。
方法:フロント側をガレージジャッキで持ち上げ、リジッドラック(ウマ)をかけます。フロントタイヤが浮くくらい(30cm以上)高く上げてください。これにより、空気が自然と後ろ(エンジンの注入口)へ逃げるようになります。
② 「ペットボトルじょうご」による水位かさ上げ
理由:エンジンの注入口が低いため、圧力をかけるため。
方法:1.5L炭酸ペットボトルの底を切り、飲み口にビニールテープを巻いてフィラーネックにねじ込みます。「簡易サブタンク」として、常に冷却水が高い位置にある状態を作ります。
2. 【図解】エア抜き3箇所の位置と「触ってはいけない場所」
サンバーにはエア抜きポイントが3箇所ありますが、すべてを開ける必要はありません。むしろ触ると危険な箇所があります。
【 フロント(前) 】 [バンパー] | (1) ラジエーター (助手席シート下/グリル内) | | =======(長い配管)======= | | | (3) 床下配管 | (車体中央付近) ★危険 | | | ======================== | (2) エンジン上部 (リアバンパー開けてすぐ) ★重要 | 【 リア(後) 】
各ポイントの詳細
| 場所 | 特徴と探し方 | 重要度 |
|---|---|---|
| (1) ラジエーター (前) | 助手席下、またはフロントグリルから見えるラジエーター上部。 白い(または黄色い)プラスチックの蝶ネジ。 ※割れやすいので注意。 | △ (キャップ開放で代用可) |
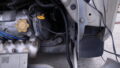
| (2) エンジン上部 (後) | エンジンルーム内、インテークマニホールド(銀色の吸気管)の頂上付近。 銅ワッシャーが入った10mm/12mmのボルト。 近くに「AIR」等のシールがある場合も。 | ◎ (ここが最重要!) |
| (3) 床下配管 (中) | 車体下の長い鉄パイプの途中にある小さなボルト。 | × (触るな!) |
⚠️ 【警告】(3)床下のボルトは絶対に回さない!
車体中央の床下にあるエア抜きボルトは、融雪剤や泥水の影響でほぼ100%錆びて固着しています。
無理に回すと簡単に折れます。ここでボルトが折れると、配管ごとの交換となり数万円の修理費、最悪は廃車になります。
この場所のエア抜きは、最初に紹介した「ジャッキアップ(前上げ)」を行うことで代用できるため、絶対に触らないでください。
3. 実践!ウォーターポンプ交換後のエア抜き手順
STEP 1:準備と注入
- フロントをジャッキアップし、ウマをかけて高く上げます。
- 「(2)エンジン上部」のエア抜きボルトを緩めます。
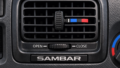
- 室内のヒーター設定を「HOT(最大)」にします(風量はOFFでOK)。
- エンジンの注入口からクーラントをゆっくり注ぎます。
- エア抜きボルトから水が溢れ出たら、ボルトを締めます。
STEP 2:アイドリングと圧送(ここが勝負)
- エンジン注入口に「ペットボトルじょうご」を挿し、水を半分ほど入れます。
- エンジンを始動します。ボコボコと泡が出てきます。
- 回転を上げる:アイドリングだけでは不十分です。2,000〜3,000回転まで煽(あお)ってください。
- 時々、回転を上げたまま数秒キープ→アクセルOFFを繰り返すと、大きな泡が抜けやすいです。
- ラジエーターホースを手で揉んで、エアを動かします。
STEP 3:完了の確認
サンバーは時間がかかります。以下の状態になるまで30分〜1時間は粘ってください。
- 電動ファンが回り出した(サーモスタットが開いた証拠)。
Why Sambar Coolant Bleeding is a “Nightmare”
The Subaru Sambar (TT/TV/TW/KS/KV series) has a unique “Rear Engine, Front Radiator” layout. Because long coolant pipes run underneath the floor connecting the radiator to the engine, air bubbles easily get trapped in these horizontal sections. If you use standard bleeding methods, air will remain, causing immediate overheating.
Here are the “Two Essential Tricks” for DIY success and the “Dangerous Bleeding Point” you must absolutely avoid.
Contents
- 1. The Key to Success: 2 Essential “Tricks”
- 2. [Diagram] The 3 Bleeding Points & Where NOT to Touch
- 3. Practical Guide: Bleeding Steps After Water Pump Swap
1. The Key to Success: 2 Essential “Tricks”
You cannot bleed the air on flat ground. You must physically create a path for the air to escape.
Trick 1: Extreme “Front Lift” Jacking
Reason: To tilt the long underfloor pipes.
Method: Jack up the FRONT of the vehicle high and place it on jack stands. Lift it until the front tires are at least 30cm (12 inches) off the ground. This forces air bubbles to travel backward towards the engine (the highest point).
Trick 2: The “Plastic Bottle Funnel”
Reason: The engine filler neck is low, so you need to increase the water pressure head.
Method: Cut the bottom off a 1.5L soda bottle. Wrap electrical tape around the mouth to fit it snugly into the coolant filler neck. Use this as a “makeshift sub-tank” to keep the water level higher than the engine.
2. [Diagram] The 3 Bleeding Points & Where NOT to Touch
There are three bleeding points on a Sambar, but you do not need to open all of them. In fact, touching one of them is dangerous.
Details of Each Point
| Location | Features & How to Find | Importance |
|---|---|---|
| (1) Radiator (Front) |
Top of radiator tank. White (or yellow) plastic butterfly nut. *Be careful, plastic breaks easily. |
Low (Can just open cap) |
| (2) Engine Top (Rear) |
Near the top of the intake manifold. 10mm or 12mm bolt with a copper washer. Often labeled with an “AIR” sticker nearby. |
High (Most Important!) |
| (3) Underfloor (Middle) |
Small bolt on the iron pipe under the car. | NO! (Do Not Touch) |
⚠️ [WARNING] NEVER turn the (3) Underfloor Bolt!
The bleeder bolt on the underfloor pipe is exposed to road salt and water, meaning it is almost 100% seized with rust.
If you try to turn it, the head WILL snap off. This leaves a hole in the pipe that cannot be plugged, requiring a full pipe replacement (expensive repair) or scrapping the vehicle.
You can bleed this section safely by using the “Front Jack Up” method described above. Do NOT touch this bolt.
3. Practical Guide: Bleeding Steps After Water Pump Swap
STEP 1: Preparation & Filling
- Jack up the FRONT of the vehicle high and secure with jack stands.
- Loosen the “(2) Engine Top” bleeder bolt.
- Set the cabin heater temperature to “HOT (Max)” (Fan can be OFF).
- Slowly pour coolant into the engine filler neck.
- When coolant overflows from the bleeder bolt, tighten the bolt.
STEP 2: Idling & Revving (The Crucial Part)
- Insert the “Bottle Funnel” into the filler neck and fill it halfway with coolant.
- Start the engine. You will see bubbles.
- Rev the engine: Idling is not enough. Rev it to 2,000 – 3,000 RPM.
- Hold the RPMs, then release the throttle repeatedly. This helps dislodge big air pockets.
- Squeeze the radiator hoses with your hand to move the air.
STEP 3: Confirmation
The Sambar takes time. Keep going for 30-60 minutes until you confirm:
- The electric fan cycles on (proof the thermostat opened).
- The cabin heater blows VERY HOT air.
*If it’s lukewarm, there is still air trapped in the heater core.
コメント